Tuesday, February 09, 2010

I Love It When This Happens!


I've had some good stamping time the past week or so.... and I even had time t straighten up my desk area. After grabbing up some fun new items at CHA, it was fun to get some stamping time. Here are a few things to share with you. The Sewing card was made for a very sweet family at church, the Streelmans, who are sadly moving to Portland. I am in LOVE with their 2 little girls Becca and Natalie and am so sad to see them go. Karen was one of our brand new helpers in Children's Choir and it was so fun getting to know their family and getting to serve alongside of them at church. The good news is, it's always good to have friends who live in fun places so we can go visit them! Card Details: Kraft card base, retired designer paper, sewing machine, buttons, Oval Punch, Scalloped Oval Punch, Puns from the Past SU Stamp Set (stamped in Chocolate Chip Ink), Twill ribbon, twine from Paper Trey Ink, Pirourette Pink SU cardstock for the scalloped oval and some old buttons from my stash.

The Polka Dot Thank You card was super easy but super fun. It's just a bunch of "Bold Bright" circles punched with my various circle punches, and glued to white cardstock. The bottom of the front panel was cut with wiggley scissors, and then the words "Thank You" from the retired SU stamp set called "Wonderful Words" was stamped on the back inside of the card so it shows when you close the card. I made a bunch of these to keep on hand because they were so fun and so easy.

Thanks for looking!

Saturday, January 02, 2010

So Very Blessed

Made this card yesterday for a very special guy. My daughter has been shopping for her first car for a while, and 2 people at our church helped us in the search. First our pastor found a great car on Craig's List (a 2001 Accura Integra) and then my friend Dave went with us to take a look at it, drive it around, look under the hood, etc. He said it was a good deal. After we scraped together our money, we went back and got the car! Her very first car. She is on cloud nine. (She's 17 1/2 and has had her license for 6 months and during that time, she and I have been sharing my van and I've been driving her to school and work.) After we got the car home, Dave (he collects and restores antique cars) decided to bless Emily by going one step further... taking the car home with him for 2 days and sanding and repainting the scratched up bumpers. They look brand new and now the car that we paid $3350 for, looks like we should have paid $5500 for it! So obviously, Dave needed a special card to know how much we appreciate him.

This old SU set, called "So Very" did the trick. The paper is from a brand new matt stack from DCWV that I got for my birthday (thanks Michelle) called Glitter Sweet Stack. It also uses Chocolate Chip and Creamy Caramel paper, same colors of ink, and a little snippet of ribbon, button and twine (copied from PaperTreyInk website); with some distressing around the edges of the paper layers. Oval punches and bronze colored brads finish the little details.
Thanks for looking. Pictures of Emily in her new car will be coming soon!!!!!

Clipboard Carnival

These are the first altered clipboards I've ever done and they were so fun. They are for some special ladies in my life, and I hope they love them as much as I loved making them for them. It was fun picking out various designer paper to fit their personalities and their office spaces. The paper is "mod podged" onto the clipboards. Ribbon added to the top, a pad of sticky notes included, some fun clips, a small piece of coarkboard, and a small calendar. The corkboard was a sheet of 18 x 24 corkboard from Joanns that I cut into small pieces and just adhered to the clipboard with tacky tape. The small calendar was the biggest challenge. I typed it in "word" and then just kept adjusting the margins, font size, etc . Not fun but I didn't have time to shop for any or order any online (like smart people would do.) My only "wish" is that I could find some "shallow" thumb tacks for the corkboard. The corkboard is very thin and a regular thumb tack is too deep. Or I should have layered (doubled) the corkboard on top of itself to make it thicker. Live and learn.
Enjoy!

Monday, September 21, 2009

A couple of cards that have been hiding in my camera

What happens when it's too hot to go into your stamp room and then you also can't find the cord that you use to upload pictures from your camera to your blog? It means you don't post anything for a very long time. I finally found my camera cord yesterday, (darn those kids!) so here are a few cards from the past few months.

This card is for my new friend Lilly, who just turned 4. Her dad is my "boss" and one of our new pastors at church, and Lilly's mom is a new friend that I really love hanging out with! Lilly is fun and smart and adorable, has blond hair and loves looking cute, so I made this card with my brand new "Cricuit" machine for her for her birthday. :)
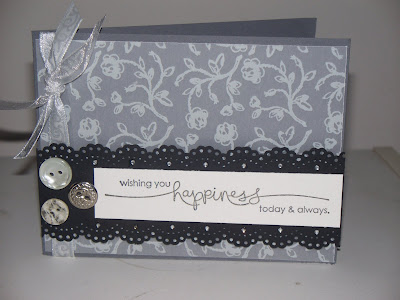
This card was made for Karra and Craig for their engagement. I've known Karra for 10 years, and have watched her grow up from high schooler, to college student to young adult, from being my kids first babysitter here in California, to one of my day camp counselors, then one of my day camp directors, to now having her own classroom as a teacher.... and now I get to help celebrate her marriage to a great guy named Craig! This card is made on Basic Gray cardstock, with printed vellum on top of it. The black strip is punched with the Martha Stewart eyelet punch, then I added some rhinestones,buttons, and a few different kinds of ribbon. Congratulations you two! I am so happy for you!


And finally, this card is for my friend Chuck that lives in Atlanta. He and his wife (Pam my very best friend!) share the same birthday!!! I didn't have a guy card that looked like Chuck's personality, so I thought this goofy pair of monkeys said it all. The DP is called "East Coast Prep" from Stampin up! and the cardstock is More Mustard, Riding Hood Red, and Tempting Turquoise. The sentiment is a separate stamp, but made to coordinate. Cool huh! I think I'll get lots of use out of these 2 stamps. (From Stampendous!)

Happy STamping... hope you don't lose your camera card anytime soon. It's not a good thing!

Thursday, June 04, 2009

TECC70


A fun layout for Taylored Expressions Cupcake Challenge #70! Uses one of my standby favorite sets: All About U and one of the newer sets from saleabration. Colors are Bashful Blue and Celery. Twine is from PaperTreyInk.

Wednesday, May 27, 2009

Parisian Quilt Card

First of all, let me share something with you that was NOT made by me... a beautiful gorgeous, quilt given to me by a wonderful family at my church.

This was a thank you gift for working these past few years with their son in my children's choir program, our Wed. night club program, etc. They wanted to express their appreciation for my time and love. Wow! I was/am overwhelmed! I have made one quilt in my life, when I was in my 20's, and it didn't turn out too well. I was proud of it, but it was far from perfection. So I know how much time and energy this took. When I make cards for people, or small handmade paper-crafting gifts like photo frames, candy tins, etc, they might take 1-2 hours per item... 3 at the most, but a QUILT? Seriously? I can't even imagine how much time this took. Here's another view... every square is DIFFERENT! How amazing is that?

So now, here's my card, made with the Quilter's Sampler set from PaperTreyInk , which has been on my wish list for a very long time. I kept wavering back and forth, waiting for the wallet to cooperate. Well, obviously, when I received this quilt, I knew I had to have this set to make a thank you card, right? I know quite a few quilters, so I know I will get a lot of use out of this set. I also got the additional phrases, called "Quilters Sampler Sentiments," and boy, oh boy, are there a ton of sentiments in these 2 sets.

The base of the card is Kraft cardstock from Stampin Up, then a layer of Parisian Breeze designer paper. The quilt images are stamped on Vanilla paper, and then layered onto Baja Breeze, and colored with a combination of Copic makers and SU markers. Some piercing, some faux stitching, and a button (tied with PaperTreyInk's new rustic twine!) completes the project. I'm anxious to get this into the mail to this sweet family... and even though my card didn't take as many hours to make as their wonderful gift to me, it is still filled with love and appreciation!

Monday, May 25, 2009

A couple of challenge cards

Emily was away this weekend on a Carnival Cruise with her choir group (Madrigals) to Catalina (supposedly to Mexico, but that didn't happen!) so I had a very quiet house... TOO QUIET actually... but at least I was able to squeeze in a little stamping time. Here are two challenge cards: The Taylored Expressions Cupcake Challenge card and the "Sketch for You To Try" card.

Here is TECC69:

The base of the card is "Lovely Lilac" followed by a layer of Green Galore, and then the FUN paper from DCWV called "Nana's Kids." It's already covered with sparkle and texture, so it really packs a punch! This is for a couple at church who is expecting their first baby, and they don't know the sex of the baby yet, so I was going for "gender neutral." The buggy is colored with an SU marker, then highlighted with a glaze pen, some Tiny Twinkles from the Taylored Expressions store, & some blue star buttons. The green dotted ribbon adds some finishing fun!

The next card is for "A Sketch for You To Try" from iheart2stamp.com. This is the first time I've posted to this sketch, so I'm so happy that I had some extra time this weekend to play along. The "trick" was to do something unique with the right hand edge of the card, so I decided to use pearls along that edge and make this into a wedding card. I also used by brand new background stamp from StampinUp! called "Bella Toile." The BG is stamped once on white paper and once on Pink Pirouette paper, and then the layers are "matched up" and adhered on top of each other. The cake stamp is from "Fun and Fast Notes." (SU!) one of my favorite sets. There are also mini pearls on the scalloped oval punch (marvy), some glitter pen and stickles on the cake image, and a stick on flower (I think I got it at Big Lots.)


Hope you all had a fantastic Memorial Day Weekend! (even if it didn't include a Carnival Cruise!)

Friday, May 22, 2009

Dearest Friend


Here's a simple card using the new SU set "Forest Friends" from the Spring Mini. The deer is stamped with Sahara Sand, (I think the first time I've used this stamp pad) and one of the individual stamps from the back of the caty! It says, "So Glad You Are One of My Dearest Friends." A special family just recently got laid off (the dad) and I am really hurting for them, so this is just to give them a little extra encouragement. Thanks for stopping by!

Wednesday, May 20, 2009

Chocolate Sky!!!

Wouldn't that be awesome? (Remember the song, "If all the snowflakes were Hershey Bars and Milkshakes?") This is for Taylor's Cupcake Challenge, TECC68. Here's the original post so you can see the sketch first hand. It's a great sketch, and fun to work with. I love this beautiful loopy flower stamp from Stampendous, and thought it would be perfect for the circle image in the sketch. The paper used is Chocolate Chip, Vanilla, Soft Sky, and Baja Breeze. The chocolate layer is clear embossed using chocolate chip craft ink (SU!) and the Filigree Background Stamp (retired SU). Several layers are pierced and the scalloped Baja Breeze layer is made with a corner rounder.

Monday, May 18, 2009

Make it a Grande

As soon as I saw this new set "A Little Caffeine Set" from Just Rite Stampers I had to have it! I usually wait a long time and think about my stamp purchases for a while before jumping in, but not this one! I ran right over to Taylored Expressions and got me some adorable coffee stamps! I put some ink on it right away, even though I didn't have the right size of wooden mount. So what did I make? A gift card holder for a Starbucks card, of course!

I used Chocolate Chip and Groovy Guava paper, along with Vanilla from SU! The Designer Paper is called "Paisley & Petals" from SEI. A super simple layout, with just a few simple additions: ribbon, scalloped punch, corner elements, and scalloped scissors (for the circle around the main image on front of card. ) I'm really looking forward to getting ink on the rest of the images in this set!

Friday, May 08, 2009

Prom Night


My daughter Emily is off to the prom tonight at the Disneyland Hotel with a friend from her Madrigal singing group, Scott. A huge group of her friends met at one of the girls' house to catch the limo/bus thing. Biggest thing I've ever seen! Emily found her dress on clearance at Windsor, and I was very proud of her for being such a good shopper. My mom took it in (because it was way too big) and I added the sequin trim. But by the time you add Limo, dinner, prom tickets, flowers, shoes, nails, hair, spray tan, jewelry, and photo's (and whatever else I'm forgetting), and oh yeah, did I mention HAIR??? it's still a very expensive evening and more than most of us spend on a family vacation or a month's worth of groceries! It's crazy! But they sure looked beautiful and I'm sure they are having a blast.

Sunday, April 26, 2009

Fabulous Riding Rood Friend! TECC65

Another Cupcake Challenge from Taylored Expessions (TECC65) using Riding Hood Red, and Pink Pirouette. What are we gonna do when those colors retire in a few short months? I love them paired with the Bella Rose paper. This card also used the "Friendly Words" jumbo wheel, and the new set "Oval All" and scalloped oval punch. There is a double layer of the scallop border, the one underneath is "Riding Hood Red" and the one on top with the "Friendly Words" wheel using R.H.R. ink. The final touches: Pink Pirouette ribbon, and some paper piercing in the corners. Thanks for another fabulous sketch Taylor! This week was so full of birthday celebrations, preparation for our children's choir musical at church (which happens next Sunday, May 3, which I direct), and a potluck dinner for single moms, that I wasn't sure I was going to be able to squeeze in some stamping time or not..... Yeah for stamping! A weekend without stamping is never a good weekend! I just wish the weekend could be longer, don't you???

Friday, April 24, 2009

Happy Birthday Sweet Emily

Yesterday was my daughter Emily's 17th Birthday! For those of you who know Emily, you know what a delight she is. She is beautiful both inside and out, she is helpful, kind, passionate about life, music, theater, dance, math :) Spanish, coffee, Chipotle, Jesus, her friends, her friends, and her friends! I had a blast planning some special surprises for her birthday, and loved making her this card. She LOVES the beach, just learned to surf over spring break, has a teal and beach "theme" in her bedroom, so I loved how all this came together. (Starting with the scrapbook sticker from Tall Mouse.) The base of the card is a full sheet of 8 1/2 x 11 "Lovely Lilac", then layered with Tempting Turquoise, and Whisper White. The blue hawaiin paper is called "Aloha Chic" from Star Fish & Dreams. The Happy Birthday sticker is from "Me & My Big Ideas" and it is layered on top of an oval cut from Yo Yo Yellow, and then layered on Lovely Lilac. This is the first time I've tried putting gems all around an oval scallop like this, but I've seen Taylor and Jami do it all the time, so I had to try it.


Not fun! I tried both self stick jewels and tiny taylor twinkles, but not having really good tweezers made it quite a challenge! Three flowers were stamped with the flower from "Do The Hula" (retired SU!) using Lovely Lilac, Tempting Turquoise, and Cool Caribbean Ink, cut out and mounted with dimentionals, and highlighted with a stardust pen. Some bright turquoise ribbon adds the finishing touch!


Here are a few more birthday pictures... I surprised her at school at lunch time with pizza for her and her friends and some giant balloons. She was pretty surprised at the balloons, and because she got to carry them around with her the rest of the afternoon at school, she said everyone wished her a happy birthday for the rest of the day, even people she didn't know! Bonus happiness!

This picture needs a tiny bit of explanation. No, she doesn't still play with dolls, but next week, she is starring as "Sharpay" in High School Musical at her school, Lakewood High School. (May 1,2,7,9 if you're interested!) So my little neice Grace, who is 4 years old, thought Emily should have a SHARPAY DOLL, complete with a singing microphone. Of course, I agree! That's my mom next to Emily last night at PF Changs, where we had a very yummy dinner before rushing over to Disneyland for a quick visit. It was a full, and very fun day. Happy Birthday Sweet Em! You are an amazing young lady, and I couldn't be more proud to be your mom!

Saturday, April 18, 2009

Two "Challenging Cards"

Since Emily was on Spring Break this past week, I took a few days off myself, and in between driving her to her friends' houses, or shopping for "Sharpay" outfits for her upcoming show "High School Musical," and some major house cleaning (I guess you'd call it reorganizing) I was actually able to do some "Splitcoast Challenges!" I haven't been able to do those in a long time!

The first one was the color challenge.... CC214.... Bordering Blue, So Saffron, and Pink Piriouette). When I laid all 3 colors out on my desk, they made me think "Baby Card."


The background of the card is stamped with the dots and daisy background stamp, using pink pirouette ink. The scallop is made with the fiskars "Threading Water" border punch, and the saffron layer is scalloped on the edge with scalloped scissors, and then "poked" with a paper piercer. The giraffe is stamped double and popped up with tiny pieces of foam tape, and tied around "her" neck with pink gingham. Three little buttons from my huge collection of buttons and some saffron grossgrain ribbon add the finishing touches.

Deets: Cardstock (all SU!) Pink Pirouette, So Saffron, Bordering Blue, Whisper White, Threading Water Punch and scalloped scissors (Fiskars), Buttons, floss (DMC) Saffron Grossgrain Ribbon (SU!) Paper Piercer, Dimentionals, Pink Gingham Ribbon.

The next challenge was the "Sketch Challenge" (SC224)

This was a little difficult because I couldn't find a large/ tall image that would fit the layout exactly, so I turned it on its side. The 2 stripes in the layout are "mimicked" with the saffron layer covered with the black ribbon layer. Black and Saffron are great together, don't you agree? The bird is a RUB-ON! Cool, huh! It's a little hard to photograph though.
The deets: Black and Saffron Cardstock (SU), Saffron Designer Paper, BasicGrey Periphery Rub-ons, Ticket Corner punch, black micron pen, dimentionals, silver heart charm, black organdy ribbon, saffron colored yarn.

Friday, April 17, 2009

When did these kids become grownups?

Here is the picture I took of Stephen and Emily
right before we left for church last Sunday (Easter/ April 12). What is amazing is that less than a year ago, Emily was about 6 inches taller than Stephen. For those of you who have known Stephen his whole life, or at least most of it, can attest to the fact that he has drastically changed in appearance! Stephen had to leave to go back to Indiana right after church on Sunday, so we didn't have a very traditional day (didn't do a lunch or anything... in fact, Stephen and I ate California Pizza Kitchen at the airport and Emily at Pick Up Stix with her girlfriend Sharday!)

Church was amazing and glorious, our choir and orchestra was phenominal, Brent presented the gospel so powerfully, and it was so great to be in church with my kids and my mom. I hated to see Stephen leave again, but summer will be here before we know it and he'll be back again! :)

A Word From Romans 12

This is my card for this week's Taylored Expressions Cupcake Challenge. This is a great layout for so many images. I had this sheet of flowers already water colored with the set "In Full Bloom" (on Very Vanilla paper... which turns out YUMMY!) The colors used are Saffron, Regal Rose, Chocolate Chip, and Vanilla cardstock (SU!) and Regal Rose DP. The flowers and bees are outlined in glaze pen, the edges of the Bible Verse are distressed with the edge of my scissors, and then a piece of Saffron ribbon is attached with a silver swirl clip. This is such a simple, yet profound verse of Scripture. I've had my share of hardships and afflictions in life, but nothing compared to many other friends I know. And obviously nothing compared to the people Paul was writing this letter to when he penned these words through the inspiration of the Holy Spirit. But this verse gives such basic instructions... by JOYFUL in hope, PATIENT in affliction, and FAITHFUL in prayer. If we did those 3 simple things each day, I think our lives would be transormed! :)

Saturday, April 11, 2009

Happy Easter!


I needed to make a few Easter Card yesterday, so I was happy to see Taylor's quick, easy, and simple layout featured this week on Taylored Expressions. This is Cupcake Challenge #63. Where has the time gone??? The image is from a RAK I received from Joy and Daisy at eclecticPaperie. I think it's from Stampendous. Isn't that the sweetest little bunny? The DP (from DCWV) provided the inspiration for all the colors I used: Certain Celery, Bashful Blue, Regal Rose, and Lovely Lilac. The blue twill is from Taylor's store, and the coloring is done mostly with markers, and a little bit of aquapainters. The buttons are from my big stash of buttons. I also added a little bit of Sakura Glaze pen to the flowers and Stardust pen to the border around the image.
We're on our way to our Youth Pastor's wedding this afternoon which is being held at the Japanese Gardens at Long Beach State. I'll be back later to share the wedding card I made for he and his bride. In the meantime, have a wonderful Easter weekend! He Is Risen! He Is Risen Indeed!!!!!

Sunday, April 05, 2009

Pomegranate Wish

This is probably the quickest easiest card I've ever made... or at least in a very long time. It helps when you are provide with the sketch, (Thanks to Taylor and her weekly Cupcake Sketch Challenge!) and helps even more when you are using a little bit (or a lot) of designer paper. I've had this beautiful "Making Memories" paper, called "Maddi Paisley" for a very long time because I'm always drawn to peaches and corals... I loved the fact that it looked so great with Purly Pomegranate (an 08 in-color from SU!), plus it looked like it was MADE to go with Groovy Guava. The "Whimsey" wheel is wheeled with Groovy Guava ink onto the G.G. layer, and then the designer paper is mounted onto P.P. squares. Isn't that yummy?

The butterfly from "Garden Whimsey" is stamped twice, cut out once with a coluzzle, and then just the butterfly is cut out with scissors and mounted on top of the first butterfly with the wings bent up just a tiny little bit. I also tried something new for the scallops around the butterfly circle. I refuse to buy "nestabilities" and other big "wish list" items until I'm out of debt for a large expense I had to make last year, so I keep playing around with things I already have to get the same look. This is the corner rounder punch used to go all the way around the pomegranate layer to get the scalloped look. A little time consuming, and not "perfect" but hey, it's a handmade one of a kind piece of art, right???


Final details: Star Dust Stickles, white brads, "Small Script" stamp in the corner, paper pierceing "swirly thing" in the upper right hand corner (I drew it on a piece of paper and then pierced on top of that as my pattern onto the Groovy Guava layer), and glaze pen on the butterfly antaenna.

Here's one more card that doesn't need much explanation... just that is uses DCWV "Nana's Kids" Paper that I am in love with!

Friday, April 03, 2009

Lovin Me Some Baja Breeze

Baja Breeze (from SU!) is such a peaceful, warm, relaxing color... and since I can't go to Baja in person, I'll just have to stick to using it on my cards! Cardstock is Baja Breeze and Basic Gray. This flower stamp is from Stampendous; and it is water colored with an aquapainter using Baja Breeze stamp pad. The circles are cut with a coluzzle, and the scalloped edge around the flower image and the oval image at the bottom are cut by hand with scalloped fiskars scissons. The thank you image (rub on) and the designer paper are both from the SU "Hand Drawn Bundle." And for the finishing touches: 2 prima flowers, a rhinestone brad, some basic gray ribbon (from Fabric Barn) some paper piercing around the edge of the cirlce image, and some Taylor's Tiny Twinkles in the middle of the flower. (Click here for a link to Taylor's Store.) Thanks for stopping by today for a look. My son just arrived this morning for his Spring Break visit, so I'm looking forward to hanging out with him this week (not to mention a few days off work!) I'm sure I'll get some stamping in somehow! Have a great weekend!