Showing posts with label 3D Projects. Show all posts

Saturday, November 30, 2013

Christmas Sock Advent Garland

When I saw these adorable socks at the Target $1 Spot last year, they inspired this Christmas Stocking Garland idea!  It's a combination of a garland, a stocking, and an advent activity!  My daughter is in her first apartment, and doesn't have any Christmas decorations yet, so I wanted to send her something that would brighten up her apartment, PLUS remind her that I was thinking about her each and every day.  Thus the invention of the sock-advent-garland!


It starts with 25 socks in various colors and sizes.  I hope you can find them after Christmas on sale! The socks were strung together with ribbon and a darning needle.
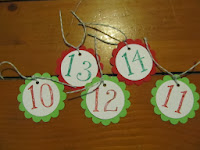
The daily numbers (1 - 25) were made with my Stampin'Up Stamps and ink pads, then punched with Stampin' Up punches (some ovals, some circles). A hole was punched at the top of each number, and a piece of Baker's Twine (from Taylored Expressions) was tied to the number tag.  The tags were GLUED to the socks with Inkssentials "Glossy Accents."


 Then the filling begins!  The secret is to either not have too many heavy items, or to have several hooks on your mantel to distribute the weight.  I did not number the socks sequentially because as each item is removed from the socks, I didn't want the garland to sag from being uneven.  The numbers are scattered haphazardly.  For my young adult daughter, the socks contain makeup, gum, earrings, small candles and Scripture verses to create her own advent candle wreath, lotion, disposable razors, candy, etc. A few socks contain family recipes on little note cards for her to add to her growing recipe collection.  Depending on your budget, you could add gift cards for gas, music, and much more! 


If you have more than one child or person opening up the socks, then you can either label the back of each number tag with a different person's name and distribute the gifts that way, or make each sock a piece of paper containing a family activity  (Day 1: Decorate the Christmas tree; Day 2:  Bake Christmas Cookies, Day 3:  Shop for Operation Christmas Child shoebox gifts, etc.)  Here is a link to my favorite "Christmas to-do list" that helps your family focus on the less fortunate while at the same time preparing your home and your heart for Christmas.   Christmas Planning List


ENJOY!  If you create an advent sock garland, I'd love to see it!  Post a link here and share it with us!  Merry Christmas!

Saturday, January 02, 2010

Clipboard Carnival

These are the first altered clipboards I've ever done and they were so fun. They are for some special ladies in my life, and I hope they love them as much as I loved making them for them. It was fun picking out various designer paper to fit their personalities and their office spaces. The paper is "mod podged" onto the clipboards. Ribbon added to the top, a pad of sticky notes included, some fun clips, a small piece of coarkboard, and a small calendar. The corkboard was a sheet of 18 x 24 corkboard from Joanns that I cut into small pieces and just adhered to the clipboard with tacky tape. The small calendar was the biggest challenge. I typed it in "word" and then just kept adjusting the margins, font size, etc . Not fun but I didn't have time to shop for any or order any online (like smart people would do.) My only "wish" is that I could find some "shallow" thumb tacks for the corkboard. The corkboard is very thin and a regular thumb tack is too deep. Or I should have layered (doubled) the corkboard on top of itself to make it thicker. Live and learn.
Enjoy!

Tuesday, March 24, 2009

Elegant Wedding Shower


My friends at work and I are giving a bridal shower next week for our Youth Pastor's Bride-to-be, Lauren. We're going with a red rose theme... elegant and classic. Here are the invitations and the wedding dress favors.
The invitations are made with SU Real Red, Basic Black, Whisper White, and vellum, as well as the rose paper from "The Paper Factory." The scalloped trim is made from a pearlized shimmery paper from Michaels, punched with the Martha Stewart lace punch. The beautiful red swirly ribbon is from the TayloredExpressions store! I love it... it adds just the elegance I was looking for. The Bible verse, I Corinthians 13 is from the SU set, "Elegant Inspirations." This is a pocket card and the actual invitation was printed on regular white cardstock, front and back, and then the corners were rounded with the corner rounder, with a black sheer ribbon on the top, attached through a round 1" circle folded over the top.
The wedding dress favors are also from Taylor's store... they come flat, and I found them quite easy to stamp on and fold up. I used some swirly stamps I believe I got at Michael's, with Real Red ink and more of the swirly red ribbon. Inside the dresses are a few pieces of Dove Chocolate. Then I folded in the side and attached them together with a dimentional. I'll be sure to post some photos in a few days of the shower, so you can see the whole thing all put together. My friend Michelle is doing the flower centerpieces, so it's going to be gorgeous!

Thursday, March 19, 2009

Treasure Box

From the tutorial that Jenn Balcer and Lynn in St. Louis posted on Splitcoast a few weeks ago. The only problem I had was getting the piece of cardstock to feed through my printer, but other than that, it was pretty easy. The DP is from Die Cuts with a View and the stamped image is "Merci" from Stampin Up! The twill ribbon is from TayloredExpressions. It's super easy. Try it! The butterfly is cut out, bent a little bit and glued on with sticky strip. The butterfly, heart and flower also have lots of "stickles" on them, as well as a row of stickle dots around the front scalloped piece. I wanted to pick up on the sparkle patterns in the DP.


Here is the link for the pattern and instructions, by "Lynn in St. Louis" on Splitcoast. http://www.splitcoaststampers.com/forums/showthread.php?t=419606